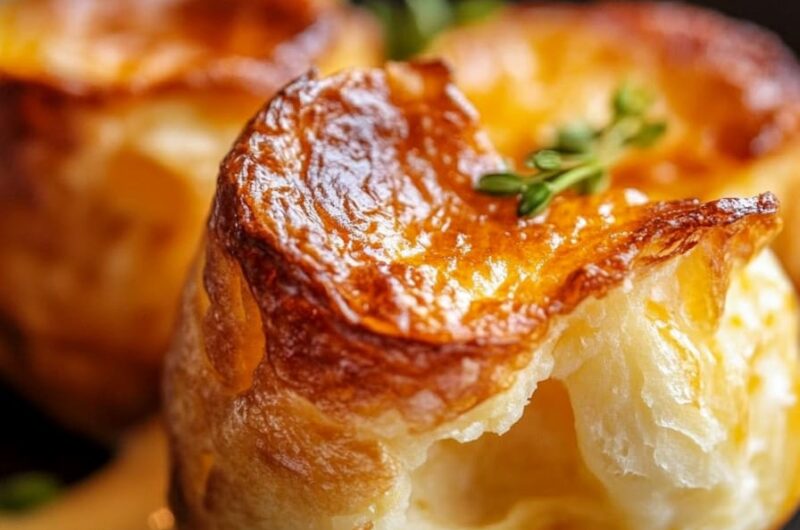
Light & Buttery Classic Popovers are the perfect way to elevate any meal, whether you’re enjoying a quiet brunch or hosting a festive gathering. This recipe creates deliciously airy and light popovers that are irresistibly buttery and crispy on the outside. With their stunning towers rising from the baking dish, these popovers not only taste great but also provide a visual feast that delights anyone who gathers around your table. Imagine biting into the soft, warm interior that holds just enough air to create a delicate texture that seems to melt in your mouth.
If you’ve ever had the pleasure of enjoying a popover fresh from the oven, you know just how wonderful they can be. They are the kind of baked good that impresses without requiring excessive effort. In this guide, we’ll explore the magic behind Light & Buttery Classic Popovers, detailing everything from why you’ll love this recipe to the step-by-step instructions for achieving that perfect rise. Even if you consider yourself a novice in the kitchen, you’ll find that making popovers is not only doable but also incredibly rewarding.
The beauty of Light & Buttery Classic Popovers lies in their versatility. They can be served sweet or savory, making them suitable for any occasion. Whether you enjoy them with a drizzle of honey, a sprinkle of cinnamon sugar, or alongside a savory dish like beef stew, these popovers will impress your family and friends. Moreover, their simple ingredient list and straightforward instructions make them an accessible recipe for anyone.
Let’s dive into what makes Light & Buttery Classic Popovers a must-try recipe for any home cook!
Why You’ll Love This Recipe
The allure of Light & Buttery Classic Popovers lies in their blend of simplicity and sophistication. Here are several reasons why this recipe deserves a place in your kitchen:
1. Light and Airy Texture – The popovers rise like magic, creating a delightful hollow center that is incredibly fluffy.
2. Quick and Easy – With just a few ingredients, the prep time is minimal, making it easy to whip up a batch at any time.
3. Versatile – Adapt them to your taste by adding herbs, cheese, or spices. The possibilities are endless!
4. Impressive Presentation – Their graceful rise and golden color make them a show-stopping addition to any meal.
5. Minimal Ingredients – Most ingredients are pantry staples, ensuring you can make them on a whim.
6. Perfect for Any Meal – Whether it’s breakfast, lunch, or dinner, these popovers complement a variety of dishes beautifully.
With these compelling reasons, you can understand why so many people fall head over heels for Light & Buttery Classic Popovers. They are truly a treat that everyone should try at least once!
Preparation and Cooking Time
The process of preparing Light & Buttery Classic Popovers is not only enjoyable but also efficient. Here’s a breakdown of the time involved:
– Preparation Time: 15 minutes
– Cooking Time: 30-35 minutes
– Total Time: 45-50 minutes
These times may vary slightly based on your kitchen equipment and experience level, but they provide a solid estimate for planning your cooking session.
Ingredients
– 1 cup all-purpose flour
– 1 cup whole milk
– 3 large eggs
– 1/2 teaspoon salt
– 2 tablespoons unsalted butter, melted
– 1 tablespoon vegetable oil (for greasing the pan)
Step-by-Step Instructions
Creating light & buttery classic popovers is straightforward when you follow these steps:
1. Preheat the Oven: Preheat your oven to 450°F (232°C).
2. Prepare the Muffin Tin: Grease a popover pan or muffin tin with vegetable oil and place it in the oven as it preheats.
3. Mix Dry Ingredients: In a bowl, whisk together the flour and salt until well combined.
4. Combine Wet Ingredients: In another bowl, whisk the eggs until frothy, and then add the milk and melted butter, stirring until mixed.
5. Combine Mixtures: Gradually add the dry ingredients to the wet mixture, stirring gently until just combined. Do not overmix; a few lumps are okay.
6. Pour the Batter: Carefully remove the hot muffin tin from the oven. Fill each cup about halfway with the batter.
7. Bake: Return the tin to the oven and bake for 30-35 minutes, until the popovers are puffed and golden brown.
8. Monitor Baking: Avoid opening the oven door during baking; this may cause the popovers to collapse.
9. Cool Slightly: Once done, remove the popovers from the oven. Let them cool in the pan for a few minutes, then gently transfer them to a wire rack.
10. Serve Warm: These are best when served warm right out of the oven.
With these easy steps, you’ll master the art of making Light & Buttery Classic Popovers!
How to Serve
To provide the best experience when serving Light & Buttery Classic Popovers, consider the following suggestions:
1. Presentation: Arrange the popovers on a decorative platter to make the dish visually appealing.
2. Accompaniments: Serve with a selection of spreads such as butter, honey, or fruit preserves for a delightful addition.
3. Pairing with Meals: They pair excellently with soups and salads, providing a light, airy contrast to hearty dishes.
4. Serving Warm: Offer them warm to enjoy the texture and flavor at their best; popovers tend to lose their delightful qualities as they cool.
5. Breakfast Delight: These popovers can be enjoyed as a part of breakfast, perhaps with eggs and bacon, making your morning even more special.
By keeping these serving tips in mind, you’ll create a memorable experience that showcases the amazing qualities of your Light & Buttery Classic Popovers!
Additional Tips
– Ensure Your Oven is Properly Preheated: A well-preheated oven is crucial for the perfect rise. This initial burst of heat is what helps the popovers to swell beautifully.
– Don’t Overmix the Batter: A few lumps in the batter are perfectly fine. Overmixing can lead to dense popovers, which defeats the whole purpose of achieving that light and airy texture.
– Experiment with Flavorings: For a unique twist, consider adding a teaspoon of vanilla extract or a pinch of nutmeg to your batter for extra flavor.
– Use Room Temperature Ingredients: Using eggs and milk at room temperature can help the batter blend more smoothly, contributing to a better overall rise in the popovers.
Recipe Variation
These Light & Buttery Classic Popovers are versatile, allowing you to experiment with various flavors. Here are some exciting variations to try:
1. Cheesy Popovers: Add a cup of shredded cheese, such as cheddar or Gruyère, to the batter for a savory twist.
2. Herb-Infused Popovers: Incorporate finely chopped fresh herbs like rosemary or thyme into the batter to add depth and flavor.
3. Sweet Popovers: For a sweeter treat, mix in a tablespoon of sugar and serve with a dusting of powdered sugar or a drizzle of maple syrup.
4. Chocolate Popovers: Substitute some of the flour with cocoa powder and add chocolate chips for a decadent chocolate version.
Freezing and Storage
– Storage: Popovers are best enjoyed fresh but can be stored in an airtight container at room temperature for up to 2 days.
– Freezing: If you have leftovers, you can freeze them! Allow the popovers to cool completely, then wrap them tightly in plastic wrap and place them in a zip-top freezer bag. They can be frozen for up to 2 months. To reheat, simply warm them in a preheated oven.
Special Equipment
For making Light & Buttery Classic Popovers, you will need the following equipment:
– Popover Pan or Muffin Tin: A popover pan will yield the best results, but a standard muffin tin can work as well.
– Mixing Bowls: Use a couple of mixing bowls for combining your dry and wet ingredients.
– Whisk: A whisk is essential for thoroughly combining your ingredients to achieve a smooth batter.
– Wire Rack: Allowing the popovers to cool on a wire rack prevents them from becoming soggy on the bottom.
Frequently Asked Questions
Can I double the recipe?
Yes, you can easily double the recipe for larger gatherings. Just be mindful of your oven space and bake in batches if needed.
What if my popovers don’t rise?
There could be several reasons: make sure your batter is not overmixed, your ingredients are fresh, and your oven is fully preheated before you start baking.
Can I use a different type of flour?
All-purpose flour works best for light and fluffy popovers. However, you can experiment with other flours, keeping in mind that results may vary.
How do I avoid soggy bottoms?
Ensure your popover pan is hot when you pour in the batter. Properly greasing the pan and avoiding under-baking are also crucial.
Can leftover popovers be reheated?
Yes! Reheat popovers in a 350°F (175°C) oven for about 5-10 minutes to revive their texture.
Conclusion
In conclusion, Light & Buttery Classic Popovers are a delightful addition to any meal. Their light and airy texture coupled with their buttery flavor makes them irresistible. Whether enjoyed plain or with various accompaniments, they are sure to impress your guests. With just a few simple ingredients and easy instructions, even novice cooks can create these stunning popovers. So, gather your ingredients and let the magic of baking unfold in your kitchen!
Light & Buttery Classic Popovers: An Incredible Ultimate Recipe

- Prep Time: 15 minutes
- Cook Time: 30-35 minutes
- Total Time: 23 minute
Ingredients
– 1 cup all-purpose flour
– 1 cup whole milk
– 3 large eggs
– 1/2 teaspoon salt
– 2 tablespoons unsalted butter, melted
– 1 tablespoon vegetable oil (for greasing the pan)
Instructions
Creating light & buttery classic popovers is straightforward when you follow these steps:
1. Preheat the Oven: Preheat your oven to 450°F (232°C).
2. Prepare the Muffin Tin: Grease a popover pan or muffin tin with vegetable oil and place it in the oven as it preheats.
3. Mix Dry Ingredients: In a bowl, whisk together the flour and salt until well combined.
4. Combine Wet Ingredients: In another bowl, whisk the eggs until frothy, and then add the milk and melted butter, stirring until mixed.
5. Combine Mixtures: Gradually add the dry ingredients to the wet mixture, stirring gently until just combined. Do not overmix; a few lumps are okay.
6. Pour the Batter: Carefully remove the hot muffin tin from the oven. Fill each cup about halfway with the batter.
7. Bake: Return the tin to the oven and bake for 30-35 minutes, until the popovers are puffed and golden brown.
8. Monitor Baking: Avoid opening the oven door during baking; this may cause the popovers to collapse.
9. Cool Slightly: Once done, remove the popovers from the oven. Let them cool in the pan for a few minutes, then gently transfer them to a wire rack.
10. Serve Warm: These are best when served warm right out of the oven.
With these easy steps, you’ll master the art of making Light & Buttery Classic Popovers!
Nutrition
- Serving Size: 12 popovers
- Calories: 150 kcal per popover
- Fat: 9g
- Protein: 4g