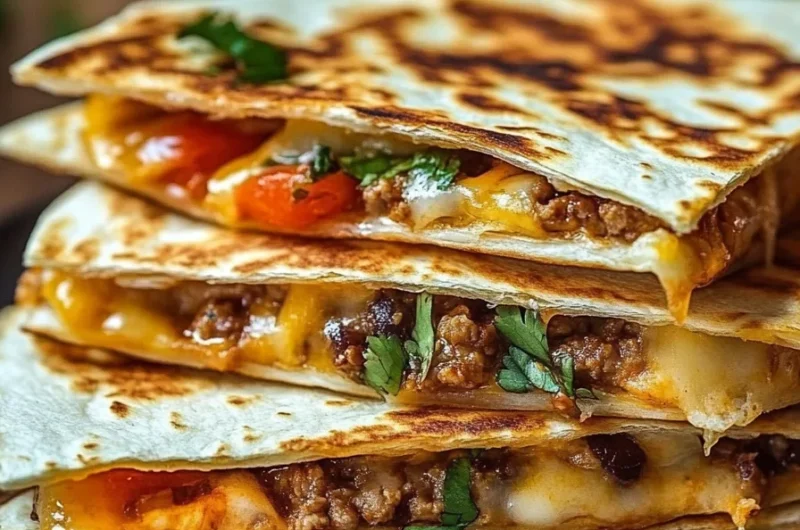
Smashburger Quesadillas are a fantastic twist on a classic favorite. This dish combines the juicy, mouthwatering flavors of Smashburger patties with the cheesy goodness of quesadillas. Every bite offers a delightful crunch followed by a burst of savory flavors that will have your taste buds dancing with joy. Whether you’re entertaining guests or simply craving a delicious meal, these quesadillas are the perfect solution. Not only do they leverage the irresistible qualities of a Smashburger, but they also offer a quick and easy way to satisfy your hunger.
If you’ve ever craved the delightful taste of Smashburger but wanted something a little different, Smashburger Quesadillas are the ideal choice. The layers of cheese, seasoned beef, and fresh toppings create an unforgettable experience. These quesadillas aren’t just food; they’re a celebration of flavor that everyone will enjoy. In this guide, you’ll discover why this recipe shines, how to prepare it, and tips for serving it perfectly. Let’s dive into the delicious world of Smashburger Quesadillas!
Why You’ll Love This Recipe
Smashburger Quesadillas hold a special appeal that few dishes can match. The combination of melted cheese, seasoned beef, and other delicious ingredients forms a perfect harmony of flavors and textures. Here’s why you’ll absolutely love this recipe:
1. Quick and Easy – With straightforward steps, you can whip up this dish in no time.
2. Rich Flavor – The combination of juicy beef and melted cheese creates an incredible experience in every bite.
3. Customizable – Feel free to add your favorite toppings like jalapeños, onions, or cilantro to make it your own.
4. Perfect for Any Meal – Whether it’s lunch, dinner, or even a snack, these quesadillas fit any occasion.
5. Family-Friendly – Kids and adults alike will love the satisfying taste and crispy texture.
6. Impressive Presentation – Serve with a side of salsa or guacamole, and you’ve got a visually stunning dish.
These factors contribute to the widespread popularity of Smashburger Quesadillas. They bring families and friends together while delivering a symphony of tastes that is both delicious and comforting.
Preparation and Cooking Time
Preparing Smashburger Quesadillas is a breeze. Here’s how much time you’ll need:
– Preparation Time: 15 minutes
– Cooking Time: 10 minutes
– Total Time: 25 minutes
These times are fairly accurate, although they can vary depending on your cooking speed and kitchen equipment. You’ll find that even novice cooks can master this recipe with ease!
Ingredients
– 1 lb ground beef
– 4 large flour tortillas
– 2 cups shredded cheddar cheese
– 1 cup shredded Monterey Jack cheese
– 1 tablespoon taco seasoning
– 1 medium onion, finely chopped
– 1 medium tomato, diced
– 1/4 cup fresh cilantro, chopped
– Cooking oil (for frying)
– Salsa (for serving, optional)
– Guacamole (for serving, optional)
– Sour cream (for serving, optional)
Step-by-Step Instructions
Creating Smashburger Quesadillas is simple when you follow these step-by-step instructions:
1. Cook the Beef: In a skillet over medium heat, add the ground beef. Cook until browned, about 5-7 minutes. Drain excess fat.
2. Add Seasoning: Stir in taco seasoning and continue to cook for another 2-3 minutes. Remove from heat.
3. Prepare Tortillas: Heat a separate non-stick skillet over medium heat. Add a touch of cooking oil to coat the pan.
4. Layer Ingredients: Place one tortilla in the skillet. Sprinkle a generous amount of cheddar and Monterey Jack cheese on half of the tortilla.
5. Add Beef and Toppings: On top of the cheese, evenly distribute the cooked beef, chopped onions, diced tomatoes, and cilantro.
6. Fold: Carefully fold the tortilla in half, covering the filling.
7. Cook Quesadilla: Cook for 3-4 minutes on one side until golden brown and crispy. Flip and cook for another 3-4 minutes on the other side.
8. Repeat: Repeat the process with the remaining tortillas until all the quesadillas are cooked.
9. Slice: Once cooked, remove from heat and allow them to cool slightly. Cut into wedges.
10. Serve: Place on a serving platter and enjoy with salsa, guacamole, and sour cream on the side.
Each step in this recipe is designed for success, ensuring delicious and authentically flavored Smashburger Quesadillas that everyone will love.
How to Serve
When it comes to serving Smashburger Quesadillas, presentation and accompaniments are key. Here are some suggestions to elevate your serving experience:
1. Plating: Place the quesadilla wedges in a circular pattern on a large platter for visual appeal.
2. Dips and Toppings: Serve alongside small bowls of salsa, guacamole, and sour cream so guests can customize their experience.
3. Garnish: Sprinkle chopped fresh cilantro or sliced green onions on top for added color and flavor.
4. Beverage Pairing: Choose refreshing drinks like iced tea, lemonade, or even a light beer to complement the hearty flavors.
5. Add Sides: Consider serving with a simple side salad or crispy tortilla chips to round out the meal.
These serving suggestions will enhance the enjoyment of Smashburger Quesadillas, making them perfect for a casual dinner, game day gathering, or family feast!
Additional Tips
– Use Fresh Ingredients: Fresh vegetables and herbs make a noticeable difference in flavor. Opt for ripe tomatoes and crisp cilantro.
– Customize Cheese Blend: Experiment with different cheeses such as pepper jack for added heat or creamy gouda for a unique twist.
– Temperature Matters: Ensure your skillet is hot enough before adding the quesadilla. This helps achieve that perfect golden crust.
Recipe Variation
Get creative with these variations to make Smashburger Quesadillas your own:
1. Spicy Kick: Add sliced jalapeños or a dash of hot sauce for a spicy version.
2. Vegetarian Option: Replace ground beef with sautéed mushrooms, zucchini, and bell peppers for a hearty meat-free alternative.
3. Savory Breakfast Quesadillas: Incorporate scrambled eggs and breakfast sausage for a delicious brunch treat.
Freezing and Storage
– Storage: Keep leftover quesadillas in an airtight container in the refrigerator. They can stay fresh for up to 3 days.
– Freezing: Wrap individual quesadillas in foil and place them in a freezer-safe bag. They can be frozen for up to 2 months. Reheat in a skillet or toaster oven for the best texture.
Special Equipment
To make your cooking experience smooth, consider having the following equipment on hand:
– Non-stick Skillet: Ideal for cooking quesadillas evenly without sticking.
– Spatula: A good spatula helps with flipping the quesadillas without spilling filling.
– Sharp Knife or Pizza Cutter: Perfect for slicing the quesadillas into wedges for serving.
– Mixing Bowl: Useful for combining ingredients before cooking.
Frequently Asked Questions
Can I prepare the filling ahead of time?
Absolutely! You can make the beef mixture a day in advance and store it in the fridge until you’re ready to assemble the quesadillas.
Can I use corn tortillas instead?
Yes, corn tortillas can be used for a gluten-free version or to add a different texture.
How do I ensure my quesadillas are crispy?
Make sure the skillet is preheated adequately and use a small amount of oil to coat the pan. This promotes crispiness.
What dipping sauces pair well with these quesadillas?
Classic choices include salsa, guacamole, and sour cream, but you can experiment with chipotle ranch or even a sweet chili sauce.
Is it necessary to fold the tortilla?
Folding the tortilla helps contain the filling and allows for even cooking. However, you can also use two tortillas to top the ingredients for a larger quesadilla.
Conclusion
Smashburger Quesadillas bring together the best of two beloved dishes into one delightful package. With each bite revealing layers of flavor and texture, it’s no wonder these quesadillas are a hit with everyone. By following the straightforward recipe and adding your personal touch, you’ll be able to create a dish that’s not just tasty but also a hit at any gathering. Enjoy the process of making these quesadillas, and savor every delicious bite!
Smashburger Quesadillas: An Amazing Ultimate Recipe

- Prep Time: 15 minutes
- Cook Time: 10 minutes
- Total Time: 25 minutes
Ingredients
– 1 lb ground beef
– 4 large flour tortillas
– 2 cups shredded cheddar cheese
– 1 cup shredded Monterey Jack cheese
– 1 tablespoon taco seasoning
– 1 medium onion, finely chopped
– 1 medium tomato, diced
– 1/4 cup fresh cilantro, chopped
– Cooking oil (for frying)
– Salsa (for serving, optional)
– Guacamole (for serving, optional)
– Sour cream (for serving, optional)
Instructions
Creating Smashburger Quesadillas is simple when you follow these step-by-step instructions:
1. Cook the Beef: In a skillet over medium heat, add the ground beef. Cook until browned, about 5-7 minutes. Drain excess fat.
2. Add Seasoning: Stir in taco seasoning and continue to cook for another 2-3 minutes. Remove from heat.
3. Prepare Tortillas: Heat a separate non-stick skillet over medium heat. Add a touch of cooking oil to coat the pan.
4. Layer Ingredients: Place one tortilla in the skillet. Sprinkle a generous amount of cheddar and Monterey Jack cheese on half of the tortilla.
5. Add Beef and Toppings: On top of the cheese, evenly distribute the cooked beef, chopped onions, diced tomatoes, and cilantro.
6. Fold: Carefully fold the tortilla in half, covering the filling.
7. Cook Quesadilla: Cook for 3-4 minutes on one side until golden brown and crispy. Flip and cook for another 3-4 minutes on the other side.
8. Repeat: Repeat the process with the remaining tortillas until all the quesadillas are cooked.
9. Slice: Once cooked, remove from heat and allow them to cool slightly. Cut into wedges.
10. Serve: Place on a serving platter and enjoy with salsa, guacamole, and sour cream on the side.
Each step in this recipe is designed for success, ensuring delicious and authentically flavored Smashburger Quesadillas that everyone will love.
Nutrition
- Serving Size: 4 servings
- Calories: 540 kcal
- Fat: 30g
- Protein: 28g